Welcome to the CME (Engage) Website documentation. This guide covers everything you need to know to work on the WordPress site, including local development setup, theme structure, and best practices.
First Day on the Job
For more in depth detail see Technical Docs - First Day on the Job
-
Logins: Ensure you have logins for the WordPress site (mediaengagement.org), WP Engine, and the appropriate permissions for the GitHub repository. Speak with the lead developer or your manager to get access.
-
Setup: Follow the Installation steps to set up your local environment. It’s recommended to use an IDE like Atom or Visual Studio Code for easier version control and syntax checking.
-
Git Usage: After your setup, familiarize yourself with our Git practices by reading the Git Usage Docs.
-
Explore Timber:
-
Check out this Timber Syntax video to familiarize yourself with Timber and Twig.
You can watch the whole video, but it covers the old way of using Timber through a plugin. Timber is now part of the theme code so disregard the plugin installation parts.
-
Read the Timber Docs Introduction.
-
We use Advanced Custom Fields in our engage-2-x/Timber theme so check out this WordPress Advanced Custom Fields video to get familiar with how the plugin works.
-
-
Explore WordPress: If you’re new to WordPress, take some time to explore the admin panel on your local environment. Feel free to experiment—any issues can be reverted with
git reset --hard origin/master. Commit frequently and work in new branches.
Pro Tips:
- Changes to the frontend are typically located in the templates or SCSS files under the
assetsfolder. -
Backend logic and queries are in the
srcfolder, but loose PHP files may also be found throughout.More info
When it comes to the code, you'll be working under the engage-2-x directory
~/Local Sites/mediaengagementorg/app/public/wp-content/themes/engage-2-x. It will take some time to get used to the structure and knowing where in the code you need to access for your project. To help get you going in the right direction, if the change you're making is to the front-end you'll want to look inside the templates folder and SCSS under assets. Backend logic and querying happen inside of PHP files, the src folder has a lot of it, but there are some lose PHP files out and about.Check out the Theme Structure section for more info.
Installation
For more in depth detail see Technical Docs - Sync with GitHub
Step 1: Install Local App
- Download and install WP Engine Local App.
Step 2: Import the .zip
-
Request the lead dev for a “slimmer” version of the site.
-
In the Local App, click the plus (+) icon and select “Existing ZIP” to import the site.
-
Configure: PHP 8.2.10+, Nginx, and MySQL 8.0.16+.
-
Next step it will import. When it is done you can click the “WP Admin” button to open the WordPress Dashboard. Temporary login:
- Username:
adminDev - Password:
adminDev
- Username:
After you log in you should add yourself as an “Administrator” user in WP Admin / Users / Add new.
Step 3: Add Proxy URL to webpack.mix.js
- Create a
config.jsonfile in the theme root:{ "proxy": "http://localhost:10000" }
For more in depth detail see Technical Docs - Set proxy URL in webpack.mix.js
Step 4: Proxy Requests for /wp-content/uploads/
-
Set up a proxy to save storage on you local machine by fetching images from the live/production site. If this step is not completed your local site willnot show any images.
How to configure the proxy
-
Create a file named
uploads-proxy.confin thesiteRoot/conf/nginxdirectory with this content:location ~ ^/wp-content/uploads/(.*) { if (!-e $request_filename) { rewrite ^/wp-content/uploads/(.*) https://mediaengagement.org/wp-content/uploads/$1 redirect; } } -
Open
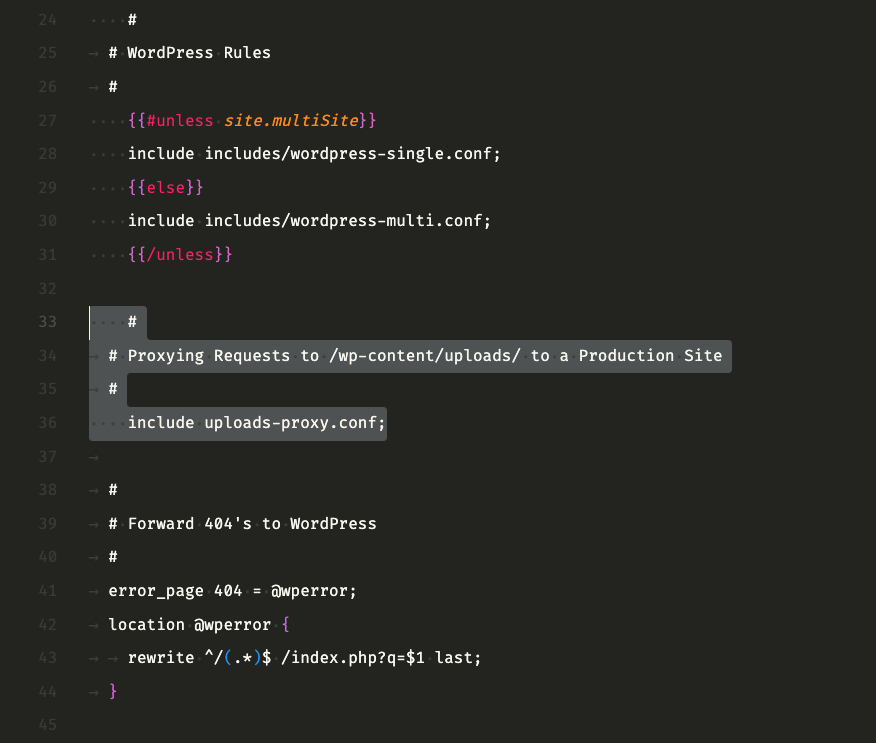
siteRoot/conf/nginx/site.conf.hbsin your editor and add the below snippet below theline in the `# WordPress Rules`:include uploads-proxy.conf;Your updated
site.conf.hbshould look like this screenshot:
- Save and restart the site in the Local App.
-
Step 5: Sync with GitHub
In terminal navigate into ~/[site root]/app/public and enter the following commands to initialize the repository and set the remote origin:
git init
git remote add origin https://github.com/engagingnewsproject/enp-platform.git
git fetch --all
git reset --hard origin/master
Now you should be connected to the GitHub Repo and in sync with the master branch. To confirm this run:
git remote -v
Output should be something like:
origin  https://github.com/engagingnewsproject/enp-platform.git (fetch)
origin  https://github.com/engagingnewsproject/enp-platform.git (push)
Last you can clean up untracked files (if needed): If you want to remove any untracked files or directories that are not present in the master branch, you can run:
git clean -fd
Local Development
Initial Setup
You will only need to run the Initial Setup once.
Be sure to run below steps 1-4 from the engage-2-x/ theme directory:
[site root]/app/public/wp-content/themes/engage-2-x
Step 1: Install nvm
If not installed already, install nvm (Node version manager) on your local machine.
Step 2: Create .nvmrc file
Create a .nvmrc file in your [site root]/app/public/ directory with one line as the content:
8.7.0
Step 3: Switch Node Version
Use the Node version in the .nvmrc file:
nvm use
Step 4: Install Dependencies
npm install
Boot up local server
Step 1: Create a branch for your task
First create a new local branch according to the Quick Working Development Guide
Step 2: Start Development Environment
The watch command below boots up your local dev server with live reloading. From the engage-2-x/ theme directory run:
npm run watch
To close your local dev server hit control + c.
Important to run the command below when you are done working on your task and ready to push to origin.
Step 3: Build for Production
Before pushing changes, compile and minify the assets:
npm run production
Now you can push your changes to the remote origin.
Technical Docs - Local development
Editor/IDE
At this time of writing, the recommended editor/IDE is VS Code. Here’s a list of the VS Code recommended extensions:
Main Extensions
- PHP Debug
- PHP DocBlocker
- PHP Intelephense
- PHP IntelliSense
- ESLint
- Prettier - Code formatter
- Timber Snippets
- Twig Language 2
Additional Extensions
Coding Guidelines
Files You Should Not Edit
It’s important to understand that certain files and folders in the engage-2-x/ directory/theme the should never be manually edited because they are automatically generated or managed by external tools. Editing these files can lead to confusion, break the site or cause your changes to be overwritten.
dist/Folder: Contains compiled files. Do not edit them.node_modules/Folder: Contains npm dependencies. Managed automatically.vendor/Directory: Contains PHP dependencies, managed by Composer.config.json: Each developer manages their own local version..lockFiles: Managed by Composer and npm, don’t edit manually.mix-manifest.json: Automatically generated, no need to change.
For more in depth detail see Technical Docs - Coding Guidelines
Best Practices
-
Performance: Always consider the performance impact of your changes.
-
Modularity: Functions should do one thing and be easily testable.
-
Code Simplicity: Prioritize simple, well-documented code over clever or complex solutions.
Git Usage
- Always create separate branches for new features or bug fixes.
- For more in depth detail see Technical Docs - Git Usage
- Push to the
masterbranch only after code review and testing.
For more detailed Git workflows, see Technical Docs - Quick Working Development Guide.
SCSS Guidelines
For more in depth detail see Technical Docs - CSS
Workflow
- Use mobile-first design when writing styles.
- Compile and minify SCSS files to
dist/css/app.cssby running:npm run production
BEM Naming Conventions
.block__elementfor elements..block--modifierfor modifiers.
Theme Structure
Engage uses the Timber framework and Twig templating engine. Familiarize yourself with:
Understanding a custom page template
Check out the existing page, Solidarity Journalisim, setup:
- Base file: page-solidarity-journalism.php renders the page-solidarity-journalism.twig markup:
Timber::render(['page-solidarity-journalism.twig'], $context, ENGAGE_PAGE_CACHE_TIME); -
.twig file:
templates/page-solidarity-journalism.twigholds the markup/html for the page template.- In this file you will also see
includeblocks where other .twig partials are included:
{% include "partial/tile.twig" with { 'tile': post } %}
The base
page-solidarity-journalisim.phpfile renders thepage-solidarity-journalism.twigfile.page-solidarity-journalisim.phpcode:<?php /** * Template Name: Solidarity Journalism * Description: A Page Template for Solidarity Journalism */ $context = Timber::context(); $post = $context['post']; // get newsroom resource posts from the relationship field $resource_posts = get_field('resource_posts'); $context['resource_posts'] = $resource_posts; // END newsroom resource posts Timber::render(['page-solidarity-journalism.twig'], $context, ENGAGE_PAGE_CACHE_TIME); // render of the .twig fileThe
Template Name: Solidarity Journalismis required for WordPress to understand this file is a page template.Create a sample page template
You can create a quick sample on your local installation to test. Just copy the
page-solidarity-journalism.phpfile code into a newpage-sample.phpChange
page-sample.phpfrom:<?php /** * Template Name: Solidarity Journalism * Description: A Page Template for Solidarity Journalism */ $context = Timber::context(); $post = $context['post']; // get newsroom resource posts from the relationship field $resource_posts = get_field('resource_posts'); $context['resource_posts'] = $resource_posts; // END newsroom resource posts Timber::render(['page-solidarity-journalism.twig'], $context, ENGAGE_PAGE_CACHE_TIME);to:
<?php

/**
* Template Name: Sample
* Description: A Page Template for Sample
*/

$context	= Timber::context();
$post		= $context['post'];

// get newsroom resource posts from the relationship field
$resource_posts = get_field('resource_posts');
$context['resource_posts'] = $resource_posts;
// END newsroom resource posts

Timber::render(['page-sample.twig'], $context, ENGAGE_PAGE_CACHE_TIME);
then you create a new
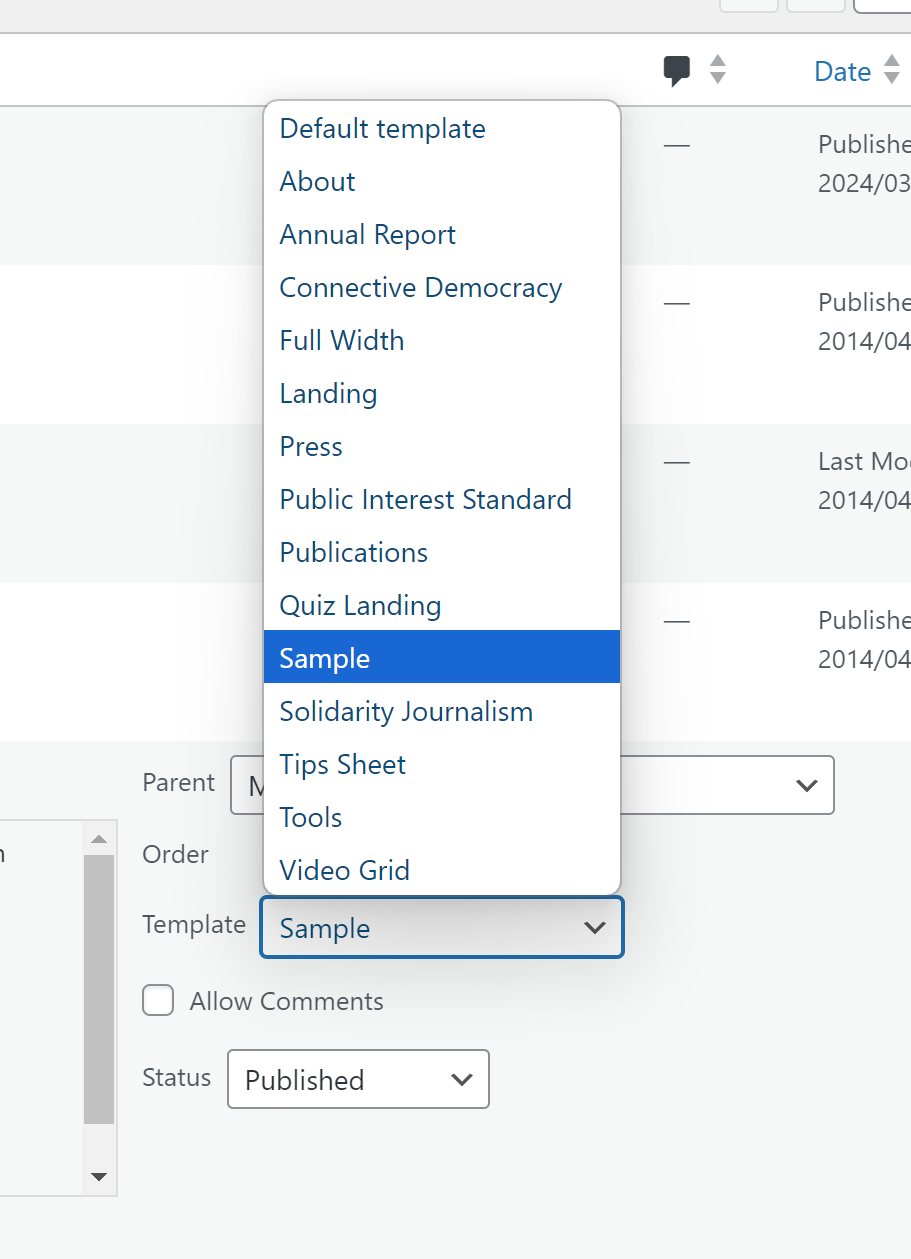
templates/page-sample.twigfile and add simple HTML:<div class="sample-page"> <h1>Sample test</h1> </div>now when you go to WP Admin and add a new page you should see “Sample” in the Page attributes > Template dropdown.

PHP providing the data to the Twig files
Referring back to the
page-solidarity-journalism.phpfile, this code:$resource_posts = get_field('resource_posts'); $context['resource_posts'] = $resource_posts;… is where the
resource_postsdata from Advanced Custom Fields(ACF) is assigned to a variable and adds it to the page$context.It is highly suggested to check out the Timber Context Docs.
Getting into the fine details now….
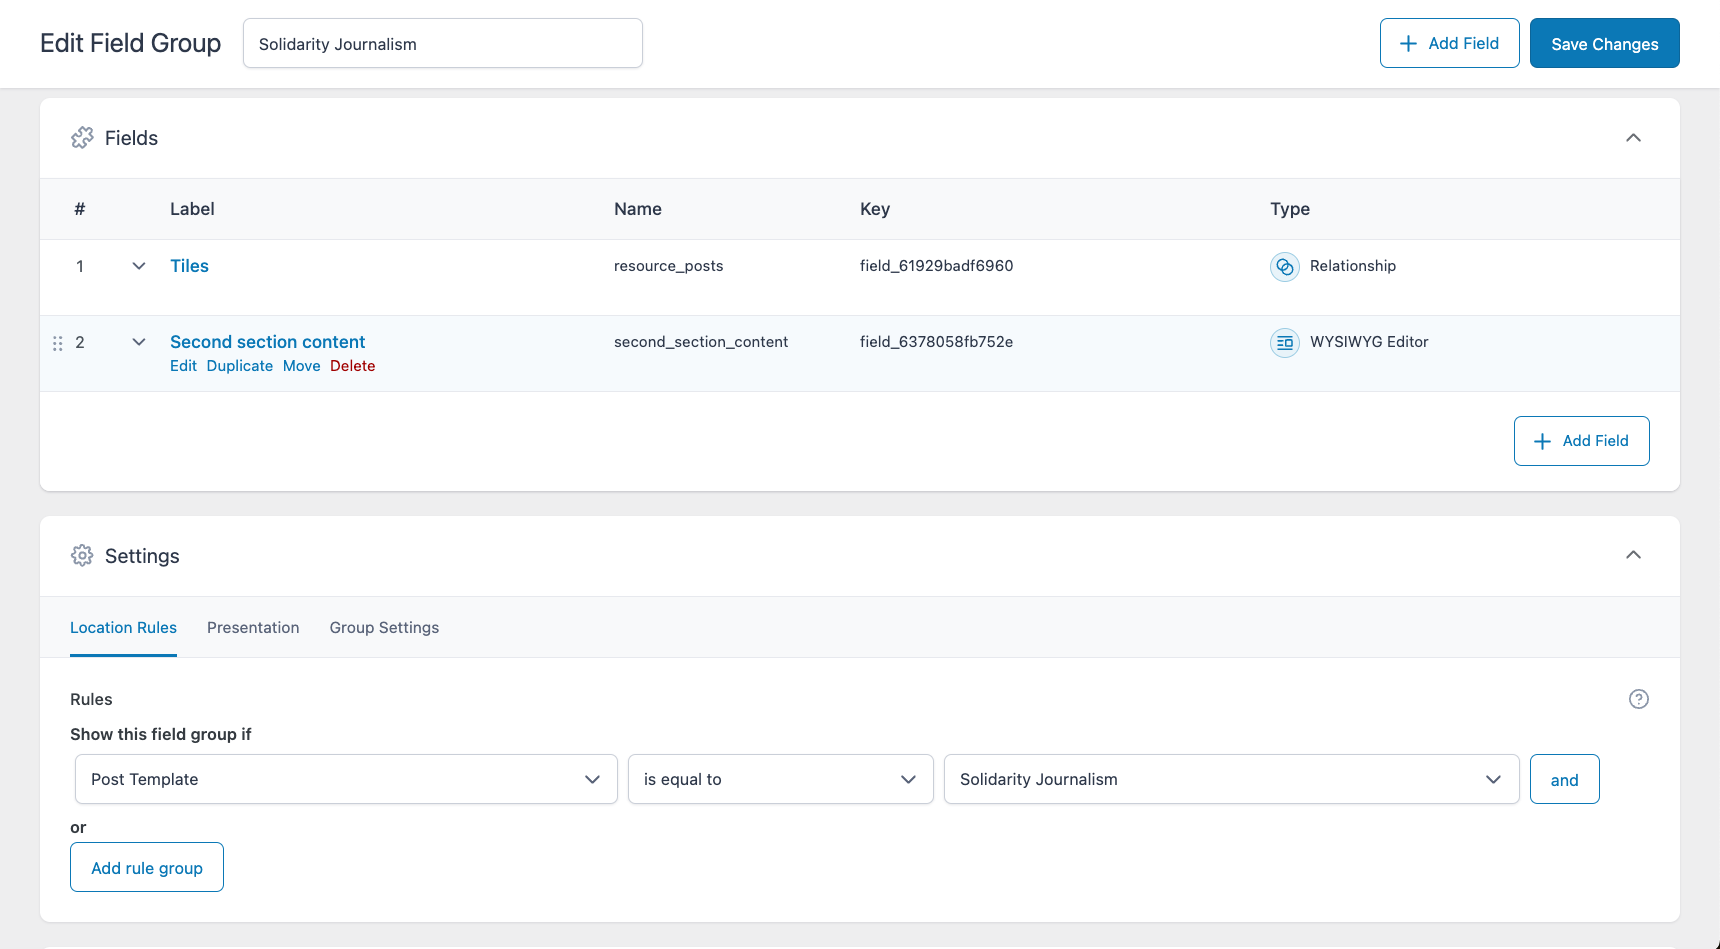
get_field()this is the ACF’s function to pull data. In WP Admin sidebar check out the field group ACF > Solidarity Journalism.
resource_postsRelationship type field corresponds to theget_field('resource_posts').How are the ACF fields assigned to a page/post template?
In the field group look for “Settings”. In this example the “Location Rules” are set to the post template “Soldiarity Journalisim”

- In this file you will also see
Plugins
ENP Registration Plugin
- Refer to the ENP Registration plugin for custom registration details.
SEO (Rank Math)
- Follow Rank Math guidelines for SEO optimization.
Deployment Workflow
Branching Strategy
master: Main working branch.stable: Represents the production state.- Features/Issues: Use branches like
feature-*orbug-*for development.
Deployment Steps
- Push to Dev for testing.
- Merge into Stable and tag the release.
- Push to Staging for final approval.
- Deploy to Production.
Git Push with WP Engine
- Add your SSH key and set up remote repositories for WP Engine production and staging environments.
Troubleshooting
Valet Conflicts
Stop Valet if using Local by Flywheel:
valet stop
WP-CLI Commands
- Check for Updates:
wp plugin list --update=available - Optimize Database:
wp db optimize